
Why it works: Unit 1.2: Image sensing, Unit 1.3: The image as data
Brightness and Contrast in OpenCV
Brighten an underexposed photo two ways, adding a constant with cv2.add or multiplying with cv2.convertScaleAbs, and measure which lands closer to the target exposure: 18.0 against 9.1.
Brightening a photo means changing every pixel’s number, and there are two simple ways to do it: add the same amount to each, or multiply each by the same factor.
Where you have met it: the Brightness and Contrast sliders in every phone photo editor; GIMP’s Colors › Brightness-Contrast; the Exposure slider in Lightroom and darktable.
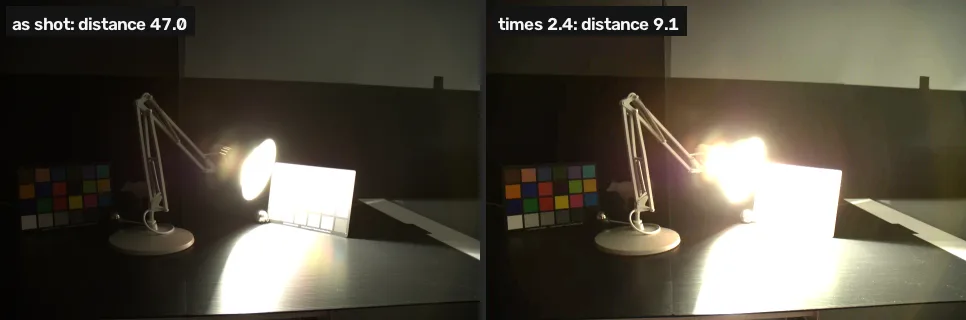
TL;DR. Multiplying the pixel values brightens a dark photo far more faithfully than adding to them, because a longer exposure multiplies the light. On this photo, adding 50 leaves an average gap of 18.0 to a target exposure and multiplying by 2.4 leaves 9.1.
The problem
Lesson 2 showed the dark photo’s histogram squashed into the left end. The fix has to move it right. The module has a longer, better-exposed shot of the same scene (the target), taken at 5 seconds, so every fix can be scored: how far, on average, is each pixel and channel of the fixed photo from the same pixel of that target? Lower is better, 0 is identical.
Add, then multiply
OpenCV’s brightness-and-contrast tutorial writes both as one formula, output = α × input + β [1]. β is added to every value (brightness); α multiplies every value (contrast, or gain). cv2.add does the addition, and cv2.convertScaleAbs does the multiplication, rounds, and clamps the result to 0–255.
import cv2
import numpy as np

img = cv2.imread("dark.webp")
ref = cv2.imread("reference.webp")

def distance(a, b):
    # mean gap per pixel and channel, on the 0-255 scale
    return np.abs(a.astype(int) - b.astype(int)).mean()

added = cv2.add(img, np.full_like(img, 50))
multiplied = cv2.convertScaleAbs(img, alpha=2.4)
print("as it is:  ", round(distance(img, ref), 1))
print("add 50:    ", round(distance(added, ref), 1))
print("times 2.4: ", round(distance(multiplied, ref), 1))as it is: 47.0 add 50: 18.0 times 2.4: 9.1
| Function | Arguments | What it does |
|---|---|---|
cv2.add(img, other) | two arrays of the same shape | adds them, stopping at 255 |
cv2.convertScaleAbs(img, alpha, beta) | gain alpha, offset beta | alpha * img + beta, rounded, absolute value, clamped to 0–255 |
np.full_like(img, 50) | a shape and a value | an array like img, filled with 50 |
Adding 50 was the best addition, and multiplying by 2.4 the best multiplication, when each was tried in steps across its range (the search is in the module’s code, linked from the project page). Multiplying roughly halves the remaining gap.
def half(x):
    return cv2.resize(x, None, fx=0.5, fy=0.5)

small = [half(x) for x in (added, multiplied, ref)]
cv2.imshow("add 50 | times 2.4 | reference", np.hstack(small))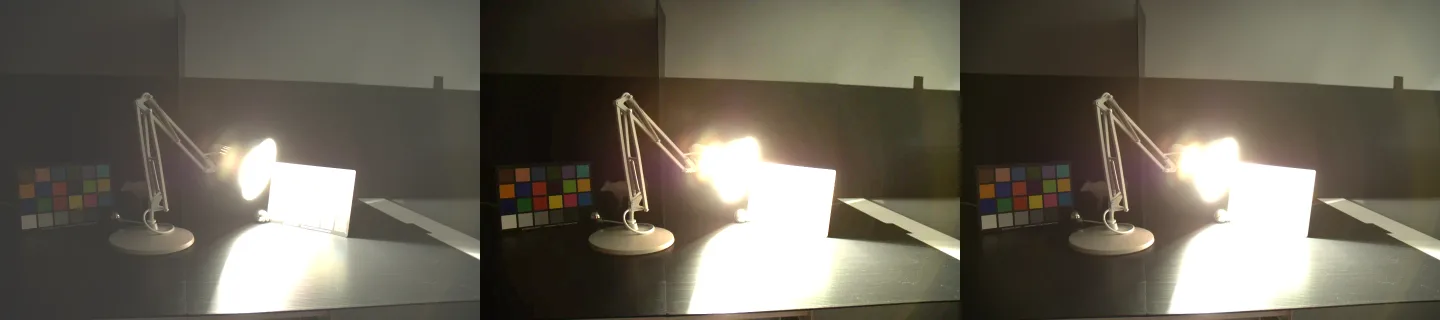
The added version (left) has a grey veil: the dark desk and wall were lifted by the same 50 as everything else, so the blacks are no longer black. The multiplied version keeps the darks dark and stretches the rest, which is what a longer exposure does. The OpenCV tutorial describes the same veil for β and notes that α costs detail in regions that were already bright [1], which is what happened to the lamp.
A gain this large works because the photo is only two stops dark. For the photo more than three stops dark, lesson 4 shows where a gain stops working.
Break it
cv2.add stops at 255. NumPy’s + on uint8 arrays does not: it wraps around, so 253 + 50 becomes 47.
# NumPy + on uint8 wraps around instead of stopping at 255
wrapped = img + np.full_like(img, 50)
y, x = np.unravel_index(img.max(axis=2).argmax(), img.shape[:2])
print("brightest pixel:", img[y, x])
print("numpy:", wrapped[y, x], " cv2.add:", added[y, x])
cv2.imshow("img + 50 with NumPy", wrapped)brightest pixel: [253 251 255] numpy: [47 45 49] cv2.add: [255 255 255]
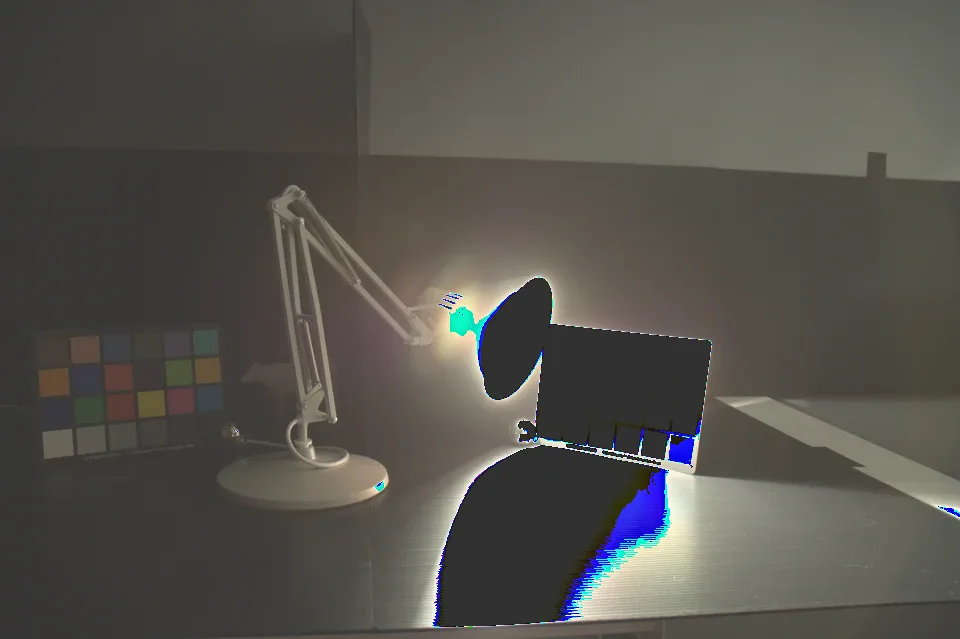
The brightest parts of the image turn into the darkest. Use cv2.add, or convert to a wider type, add, and clip.
Your turn
The overexposed photo, bright.webp, needs darkening. Choose a multiplier that brings its distance to the target under 30.
bright = cv2.imread("bright.webp")
fixed = cv2.convertScaleAbs(bright, alpha=1.0)  # change alpha
print(round(distance(fixed, ref), 1))
Why this works
The dark photo was exposed for 1.3 seconds and the target for 5, so the target collected almost four times as much light. A camera’s raw counts scale with the light, which is why a gain, not an offset, is the right shape of fix (From photons to counts). The best gain here is 2.4 rather than about 4 because the photo is not raw: its values went through a tone curve that compresses bright values, which The response curve measures on this same scene. Pixel-wise addition and multiplication of images are the basic arithmetic operations of image processing [2].
Common mistakes
img + 50with NumPy. It wraps around past 255, as the Break it cell shows.cv2.add(img, 50)with a bare number. In OpenCV 4.8.1 that adds 50 to the blue channel only; in 4.11 and 5.0 it adds to all three (both checked on 30 Sep 2026). An older install gives a blue-tinted result with no error. Pass an array, as the cells here do.- Expecting multiplication to recover clipped highlights. A value already at 255 stays at 255 whatever the gain. The lamp in this photo is lost at every setting.
- Judging the fix by eye. The added version can look brighter and nicer on a phone screen and still be further from the target exposure. Measure against something.
References
[1] OpenCV. Changing the contrast and brightness of an image! (tutorial, doc/tutorials/core/basic_linear_transform/basic_linear_transform.markdown). OpenCV 4.11.0, commit 31b0eee. github.com/opencv/opencv
[2] Gonzalez, R. C., & Woods, R. E. (2018). Digital Image Processing (4th ed.), section 2.6 “Introduction to the Basic Mathematical Tools Used in Digital Image Processing”, Arithmetic Operations, p. 69. Pearson.
[3] Fairchild, M. D. (2007). The HDR Photographic Survey. IS&T 15th Color Imaging Conference, pp. 233–238. doi:10.2352/CIC.2007.15.1.art00044