
Build a computer-vision plugin for OBS Studio, and measure what every frame costs
A step-by-step OBS Studio video filter in C++ on OpenVINO, split so the model swaps without touching the plumbing, and measured stage by stage: getting pixels off the GPU, where inference has to live so OBS never drops a frame, and what the trip from camera to virtual camera costs.
Webcam in, an AI transform in the middle, a virtual camera out at 30 FPS. The virtual camera is the part you do not write: OBS Studio has shipped one on Windows, macOS and Linux since version 26.1, and the whole job is a filter on the webcam source. This post builds that filter in C++ on OpenVINO as three parts that swap independently, an OBS shell, the pixel plumbing, and a segmentation model behind a two-method class, then measures every stage of it inside a running OBS. The model costs 1.2 to 5.3 ms across the CPU, the iGPU and the RTX. The plumbing that gets pixels off the GPU and a mask back on costs 0.2 ms per frame on the graphics thread. Where you run the model decides whether OBS drops frames, and the popular plugins run it on the one thread everything shares, which only bites once the model is heavy.
The concrete goal is an avatar-style system: a person on a webcam, transformed in real time, delivered as a camera that Zoom or Meet can select. In a project like that the architecture questions are all about the model. The engineering questions are all about the pipe, and the pipe is the same for every model you could put in it. So the plugin is built so that the pipe never touches the payload: by the end, putting a different network in it means replacing one class and one shader, and the same shell is the base for the next plugin. The payload here is deliberately small, a background-segmentation net that runs in single-digit milliseconds, so that every number in the tables is about OBS and not about the network.
If you want the model side of a heavier transform, the pupil-diameter post walks through converting a PyTorch checkpoint to ONNX and what the quantisation costs, and the RF-DETR benchmark is the reference for running a detector on the same Intel iGPU used here.
The running example
Everything below is measured on one clip: Pexels 5941016, a man at a desk in a glass-walled office, talking to a static camera, 1920×1080 at 25 fps, 16.5 seconds [12]. It loops in an OBS media source so anyone can reproduce the numbers without a webcam, and the glass wall behind him reflects the corridor, which is a fairer test for a segmentation mask than a flat backdrop.

Three devices see the same model: the CPU (i7-12700H), the Intel Iris Xe iGPU, and an
RTX 3060 Laptop GPU. All three run through OpenVINO 2026.3. OpenVINO, if you have not
met it, is Intel’s inference runtime: you convert a trained model once into its IR
format, a pair of .xml (topology) and .bin (weights) files, and at run time hand the
runtime the IR and a device string, CPU, GPU.0 for the first Intel GPU, and so on.
The CPU needs nothing extra installed; the iGPU exists only once the OpenCL compute
runtime (intel-opencl-icd) is on the machine. The third device needs a caveat
up front: OpenVINO’s GPU plugin is documented as an OpenCL plugin for Intel GPUs [8], and
the NVIDIA card shows up as GPU.1 next to the Intel GPU.0 because the plugin’s device
detector keeps non-Intel OpenCL devices around, a source-level baseline for other vendors
that has been in the tree since 2022 and is announced nowhere. It ran every model in this
post without complaint. Treat the RTX column as what it is, a measurement on an
unsupported path, and reach for TensorRT or ONNX Runtime’s CUDA provider when the NVIDIA
card is the real target.
What OBS gives you, and what it does not
OBS is a compositor. Sources produce pixels, filters transform a source’s pixels, scenes
arrange sources, and outputs (recording, streaming, the virtual camera) encode the composed
canvas. A video filter is a plugin that registers an obs_source_info with
type = OBS_SOURCE_TYPE_FILTER and a handful of callbacks, and OBS calls those callbacks
for every frame of whatever source the user attached the filter to [1].
Two facts shape everything else in this post.
The virtual camera is an output, and it is already there. OBS 26.0 added it on
Windows and 26.1 on macOS and Linux [5]. On Linux it is a v4l2loopback device that OBS
writes raw YUYV frames into [6]; on Windows a DirectShow filter; on macOS a camera system
extension. Its output type can be the program canvas, the preview, one scene, or one
source [4]. A filter attached to the webcam source is part of that source’s render and
therefore part of all four.
Scripts are not the place for this. OBS ships Python and Lua scripting [7]. The
Python bindings cannot register a source at all; Lua can, and a Lua script source can even
draw with the graphics API, but nothing in either binding gives you a pixel buffer to hand
to a neural network at 30 fps. A frame-touching plugin is C or C++, built against
libobs, and the official obs-plugintemplate repository is the sanctioned starting
point [3].
One plugin, three parts
The build produces one shared module from three source files, and the split between them is the thing to keep when this plugin becomes the base for the next one.
plugin/
├── src/plugin-main.cpp       # module entry: registers the filter with OBS
├── src/cv-filter.cpp         # shell + plumbing: callbacks, readback, worker, upload
├── src/segmenter.{cpp,hpp}   # payload: the model behind a two-method class
└── data/
    ├── effects/mask-composite.effect               # the compositing shader
    └── models/<variant>/{fp32,fp16,int8}.{xml,bin}
The shell is everything OBS requires: the obs_source_info registration, the
callbacks, the properties panel. The plumbing moves pixels, a frame off the GPU and a
result back on. Between them they know one fact about the payload, that it consumes BGRA
pixels and produces a single-channel mask. The payload is one class, Segmenter, and
it is the only code in the plugin that includes an OpenVINO header.
A different plugin from this base keeps steps 1 to 3 below as they are and replaces the
payload and the shader: a style-transfer filter changes what run returns and what the
effect draws, and nothing else. The Python package in the repository mirrors the payload
class step for step (src/obscv/core/segmenter.py), so a candidate model can be
benchmarked in Python before any C++ changes.
One practical note before the steps. The repository README carries the install script
for everything here: the OBS PPA that provides the libobs headers, the OpenVINO
archive download, and the exact CMake invocation. The trained model files ship
committed in plugin/data/models/, so following along needs no Python at all, and
every step runs on a plain CPU; an Intel iGPU or an NVIDIA card only changes the
numbers in the tables.
Step 1: a build you can read whole
To follow along, clone the companion repository rather than the template: the template
is where a plugin goes when it ships, with Windows and macOS packaging and CI that a
first plugin does not need. The build here is one readable CMakeLists.txt that does
four things: find libobs, find OpenVINO, find OpenCV, build one module.
find_package(libobs REQUIRED)                       # headers from the obs-studio PPA
find_package(OpenVINO REQUIRED COMPONENTS Runtime)  # -DOpenVINO_DIR=<archive>/runtime/cmake
find_package(OpenCV REQUIRED COMPONENTS core imgproc)

add_library(obs-cv-plugin MODULE
  plugin/src/plugin-main.cpp
  plugin/src/cv-filter.cpp
  plugin/src/segmenter.cpp
)
target_link_libraries(obs-cv-plugin PRIVATE OBS::libobs openvino::runtime ${OpenCV_LIBS})
Two details in the full file earn their comments. The module’s RPATH bakes in the
directory of the OpenVINO runtime it linked against, because OBS dlopen()s the plugin
and would otherwise need setupvars.sh sourced before every OBS launch. And an
install-user target copies the module and its data/ directory into
~/.config/obs-studio/plugins/, the per-user location OBS scans on Linux, so installing
needs no root.
The entry point registers one source and is shorter than the build file:
// plugin/src/plugin-main.cpp
OBS_DECLARE_MODULE()
OBS_MODULE_USE_DEFAULT_LOCALE(PLUGIN_NAME, "en-US")

bool obs_module_load(void)
{
	obs_register_source(&cv_filter_info);
	return true;
}
cv_filter_info is an obs_source_info with type = OBS_SOURCE_TYPE_FILTER and a
function pointer for each thing the filter can do [1]. Build, run install-user, restart
OBS, and the filter is there: right-click any video source, open Filters, and add
Background Segmentation (OpenVINO) under the effect filters.

The rest of the post fills in those function pointers.
Step 2: three callbacks, one thread
A video filter gets its frames through one of two callbacks, and both are documented in the sources reference [1].
filter_video(data, frame) is the async path. OBS hands the filter the raw
obs_source_frame a camera or media source produced: a uint8_t *data[] per plane, a
linesize, and a format that is whatever the source delivered (NV12, YUY2, I420,
BGRA, …). The filter returns a frame, the same one modified in place or a different one,
or NULL to drop it. It only fires for sources that produce frames asynchronously
(cameras, media files, NDI); a filter on a window capture, a browser source or a scene never
sees it. Intel’s own OpenVINO plugins for OBS used this path [15].
video_render(data, effect) is the effect-filter path. OBS asks the filter to draw
itself, on the GPU, into the render of its source. The filter renders the thing below it
in the chain (obs_filter_get_target) into its own texture, does what it wants with
that texture, and draws the result. This path works on every kind of source, always hands
you BGRA, and composites on the GPU. Reading pixels back to the CPU for a neural network
is up to you: draw the target into a gs_texrender, copy it to a staging surface with
gs_stage_texture, and gs_stagesurface_map the surface to get a pointer [2]. The
background-removal plugin most people install uses this path [14], and so does this post.
video_tick(data, seconds) runs once per frame before rendering. It has no frame; it is
for bookkeeping.
Here is the fact the documentation states nowhere in one sentence but the source makes
plain. All three run on OBS’s single graphics thread, one after the other, for every
source, every frame. obs_graphics_thread ticks all sources, then renders all outputs,
then renders the displays. Whatever a filter does inside video_tick or video_render
delays the composition of everything else in OBS, and if the total passes the frame
period, OBS counts a lagged frame and every output, the virtual camera included, misses
one. The counters are exported from libobs/obs.h [9] (they are what the Stats window
shows as rendering lag), and the plugin reads them to report on itself.
The three CV plugins I read before writing this one all run the network on the graphics
thread: obs-backgroundremoval and obs-detect call inference from video_tick [14], and
Intel’s plugin runs it inline in filter_video [15]. Each also has a way to skip frames
so the damage is bounded. This plugin keeps a sync mode that does the same, purely so
the tables below can show what it costs, and a worker mode that is the design.
Step 3: pixels off the GPU without stalling it
The readback is the part of the code that has no OpenCV analogue, so here it is in full
shape. One graphics fact drives it: the CPU cannot address a GPU texture directly, so
the way across is a staging surface, the driver’s CPU-visible copy of a texture, and
the copy into it runs asynchronously. In video_render:
- Draw the target into our own
gs_texrenderat the size we want.gs_orthomaps the target’s full extent onto the viewport, so when the texrender is 256×256 the GPU does the downscale and the CPU never touches a full-resolution frame. gs_stage_texturethis frame’s texture into staging surface A.gs_stagesurface_mapstaging surface B, the one staged on the previous frame, and copy its bytes out. The GPU has had a whole frame to finish that copy, so the map does not wait for it. Then swap A and B.- If the worker has published a new mask,
gs_texture_set_imageit into anR8texture. obs_source_process_filter_begin, set the mask texture and a few floats on our.effect,obs_source_process_filter_end. The shader does the compositing.
Step 3 is the one that matters. The graphics reference says of gs_stage_texture that it
copies a texture to a staging surface and to RAM, and that it is best to give it a frame
to process to prevent stalling [2]. Mapping the surface staged this frame makes the CPU
wait for the GPU to finish the copy; mapping the one from the previous frame does not.
The price is one frame of latency on the mask, which the end-to-end measurement below
includes.
// plugin/src/cv-filter.cpp (abridged)
gs_stage_texture(f->stage[f->stage_idx], gs_texrender_get_texture(f->texrender));
const int other = 1 - f->stage_idx;
if (f->stage_valid[other] && gs_stagesurface_map(f->stage[other], &ptr, &linesize)) {
	cv::Mat mapped(rh, rw, CV_8UC4, ptr, linesize);
	mapped.copyTo(f->cpu_frame);
	gs_stagesurface_unmap(f->stage[other]);
	// hand cpu_frame to the worker: overwrite the mailbox, count a drop if it was full
}
f->stage_idx = other;
The other design choice is what size to read back. The model wants 256×256. Reading the
source at its own resolution and resizing on the CPU is what you would do first, and the
plugin keeps that as a full readback option so the table can show the difference.
Step 4: the payload behind two methods
The payload’s contract with the rest of the plugin is a constructor and one call:
// plugin/src/segmenter.hpp (abridged)
class Segmenter {
public:
	Segmenter(const std::string &xml_path, const std::string &device,
	          const std::string &cache_dir);
	// 8-bit BGRA in, any size; 8-bit mask out at model resolution, 255 = person.
	void run(const cv::Mat &bgra, cv::Mat &mask_u8, SegmenterTimings &t, int repeats = 1);
	int input_width() const;
	int input_height() const;
};
The shell constructs it from the properties (which IR file, which device) and the worker
calls run; nothing else crosses the boundary, which is what makes the payload the part
you replace. Behind it in this plugin is MediaPipe’s selfie segmentation model, a
MobileNetV3-shaped network that
takes a 256×256 RGB image and returns a 256×256 alpha in [0, 1] [10], which the class
scales to the 0-to-255 mask it hands back. It has 106,417 parameters and its ONNX file
is 462 KB [11]; a _landscape export of the same network takes a 256×144 input, and
the tables carry both sizes. It is the model behind the “blur my
background” button in a lot of video-call software, which is why it is the right
payload for a post about plumbing: nobody has to wonder whether the network can keep up.
The plugin ships FP32, FP16 and INT8 builds of it and defaults to FP16; a section
after the build steps measures why.
Step 5: the composite and the controls
The mask returns to the GPU as an R8 texture and a short effect file does the
compositing. An .effect is OBS’s shader format, an HLSL-flavoured language where
image is the source texture OBS binds for every effect filter and the remaining
uniforms are set by the filter each frame. Bilinear sampling stretches the 256×256 mask over the full frame with soft
edges for free, and smoothstep turns the threshold into a feathered transition instead
of a hard stair-step:
// plugin/data/effects/mask-composite.effect (abridged)
float person(float2 uv)
{
	float a = mask.Sample(linearSampler, uv).r;
	return smoothstep(threshold - feather, threshold + feather, a);
}

float4 PSColor(VertData v_in) : TARGET
{
	float4 rgba = image.Sample(linearSampler, v_in.uv);
	return lerp(bg_color, rgba, person(v_in.uv));
}
The properties panel is the shell’s half of the controls. Device, precision and variant pick which IR loads, and changing one rebuilds the model off the render path. Threshold, feather and temporal smoothing tune the mask. Mode, readback size, a repeats multiplier and a stats CSV path exist so the sections below can measure the filter against itself, and that last group is worth carrying into any plugin built on this base: a filter that reports per-stage percentiles about its own callbacks is what makes the next two sections possible.
In code the panel is one obs_properties_add_* call per control, with the device list
filled from whatever OpenVINO enumerates on the machine:
// plugin/src/cv-filter.cpp (abridged)
obs_properties_t *filter_properties(void *)
{
	obs_properties_t *p = obs_properties_create();
	obs_property_t *dev = obs_properties_add_list(p, "device", obs_module_text("Device"),
						      OBS_COMBO_TYPE_LIST, OBS_COMBO_FORMAT_STRING);
	for (const auto &d : Segmenter::available_devices())
		obs_property_list_add_string(dev, d.c_str(), d.c_str());
	obs_properties_add_float_slider(p, "threshold", obs_module_text("Threshold"), 0.0, 1.0, 0.01);
	return p;
}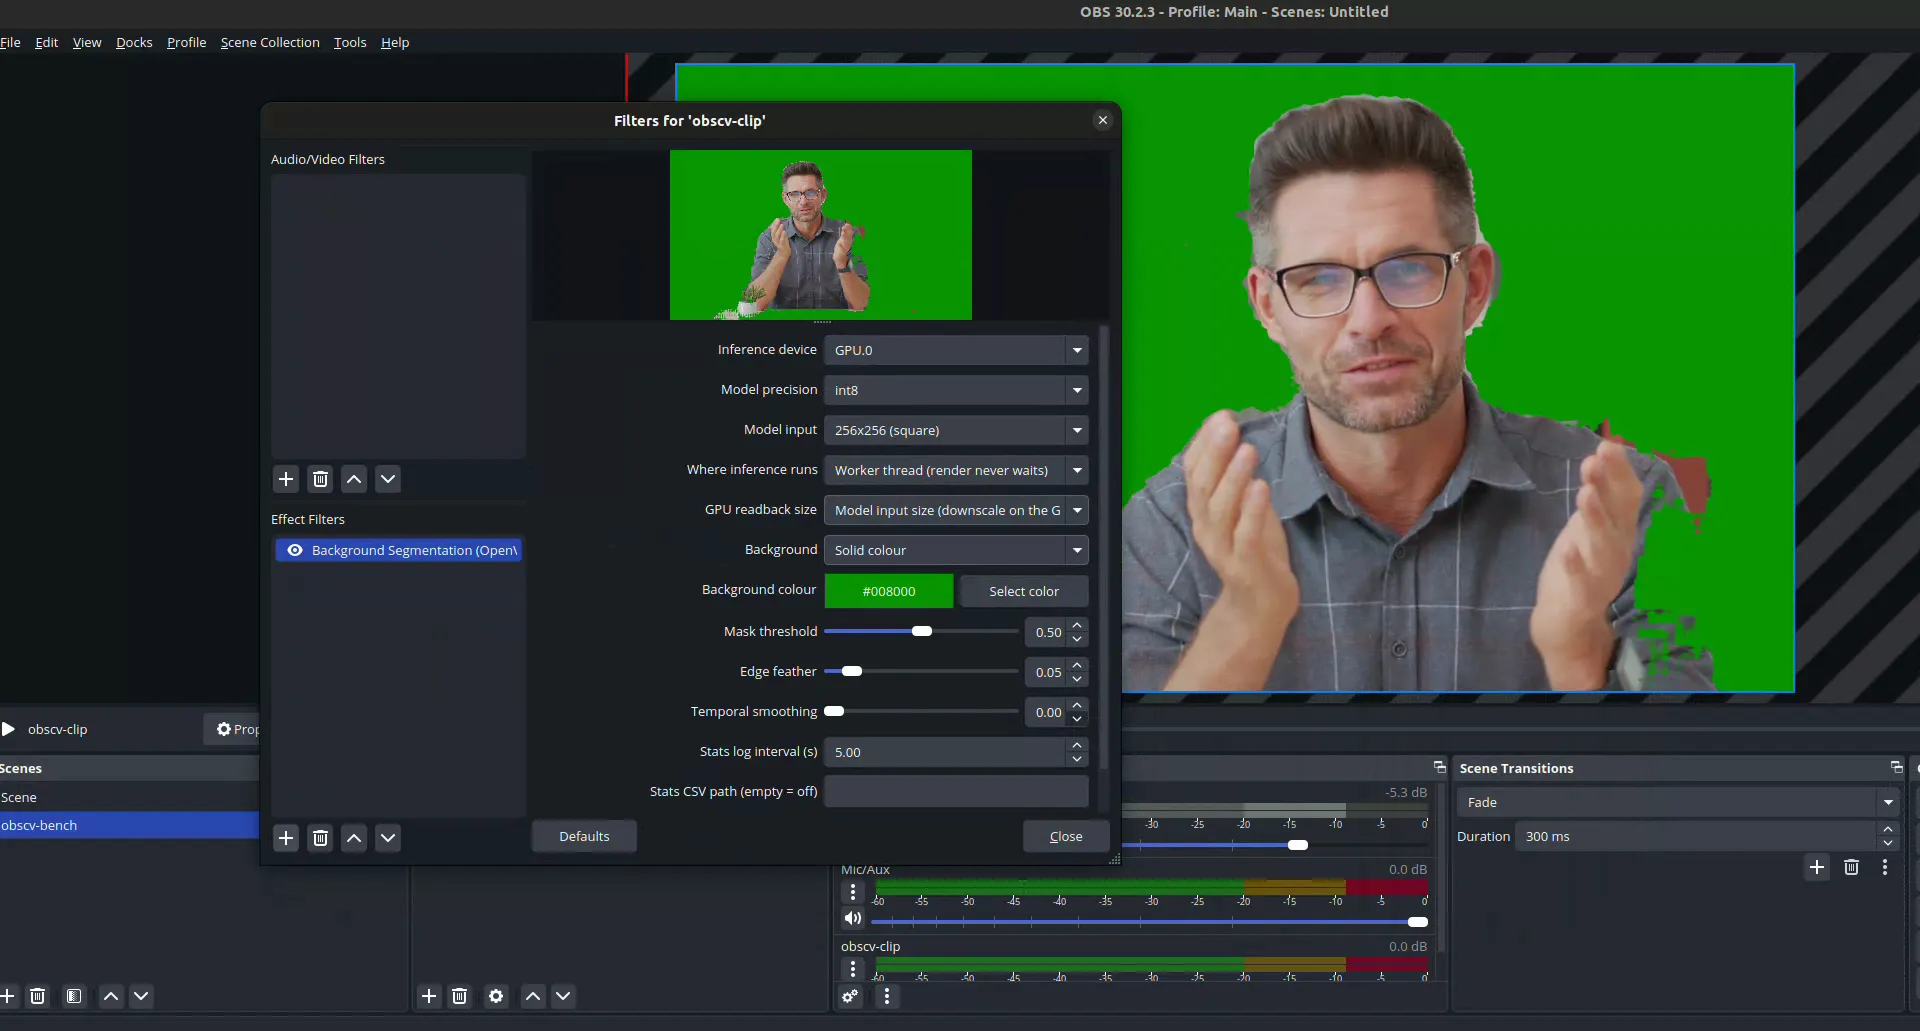
That closes the loop the post opened with. Add the filter to your webcam source, press
Start Virtual Camera in OBS’s main window, and pick OBS Virtual Camera in Zoom or
Meet: the composite the shader draws is what the call sees. On Linux the first press
offers to install v4l2loopback; on a Secure Boot machine that module needs signing
before it loads, and dmesg is where the refusal shows up.

Why quantising the model changed nothing
The pipeline is the same one every OpenVINO post on this site uses: ov.convert_model on
the ONNX with a static [1, 3, 256, 256] input, saved as FP32 and FP16 IR, then
post-training quantisation to INT8 with NNCF, OpenVINO’s compression library: it runs
the model over 100 calibration images to learn the value range each layer has to
represent, then rewrites the weights as 8-bit integers [13]. The C++ side compiles
the IR with ov::hint::PerformanceMode::LATENCY [16] and a cache_dir so the second
launch of OBS does not pay the GPU compile again [17]. The compile is not small: 5.7 s for
FP32 on the iGPU and 11.8 s on the RTX, cold.
Speed, model only, 20 warmup and 500 timed calls on real frames from the EasyPortrait test split [12], preprocessing excluded:
| Input | Precision | CPU | Iris Xe (GPU.0) | RTX 3060 (GPU.1) |
|---|---|---|---|---|
| 256×256 | FP32 | 4.37 ms | 4.02 ms | 2.50 ms |
| 256×256 | FP16 | 4.53 ms | 4.97 ms | 2.16 ms |
| 256×256 | INT8 | 4.73 ms | 4.39 ms | 2.29 ms |
| 256×144 | FP32 | 3.41 ms | 3.56 ms | 1.92 ms |
| 256×144 | FP16 | 3.51 ms | 3.79 ms | 1.75 ms |
| 256×144 | INT8 | 3.36 ms | 4.11 ms | 2.04 ms |
Mean of 500, from output/speed.csv. ONNX Runtime’s CPU provider on the same ONNX file
takes 11.57 ms for the square model, which is the usual OpenVINO-on-Intel-CPU gap and not
the point here.
Every cell is under 5 ms, and INT8 does not win a single row. On the detector benchmark, INT8 took YOLO-NAS from 151 to 215 FPS on this same iGPU; here the whole network is 0.4 MB on disk, the time is dominated by dispatching the kernels rather than by running them, and quantising the arithmetic cannot shorten a dispatch. The RTX comes out less than twice as fast as the iGPU for the same reason. The lesson generalises: below a few milliseconds, precision is not the lever, and you are back to measuring the pipe.
Quality, mean IoU over the 200 EasyPortrait test images at image resolution, 0.5 threshold:
| Input | Precision | vs FP32 on CPU | vs ground truth |
|---|---|---|---|
| 256×256 | FP32 | 1.0000 | 0.9739 |
| 256×256 | FP16 | 1.0000 | 0.9739 |
| 256×256 | INT8 | 0.9911 | 0.9717 |
| 256×144 | FP32 | 1.0000 | 0.9705 |
| 256×144 | FP16 | 1.0000 | 0.9705 |
| 256×144 | INT8 | 0.9936 | 0.9693 |
From output/quality.csv; the GPU rows agree with the CPU rows to the third decimal and
are in the artifact. INT8 moves the mask by under 1 % IoU and costs 0.2 points against the
ground truth. That is the usual “near-lossless” result, and since it buys no speed either,
the plugin’s default is FP16.
Inside OBS: what each stage costs
This is the table the post exists for. The plugin times its own stages on the graphics thread and on the worker, keeps p50 and p90 over a five-second window, and writes them to a CSV alongside OBS’s own lagged-frame counter. A script drives OBS over obs-websocket, the remote-control API OBS ships (enabled in Tools → WebSocket Server Settings), through every combination: the clip’s 720p and 1080p renditions on a fixed 1920×1080 canvas at 30 fps, three devices, FP16, worker and sync, model-size and full readback, 30 seconds each after a five-second settle.
All 24 rows are in output/plugin_stages.csv; here are the twelve for the 1080p
rendition, FP16, p50 in milliseconds over the 30 s window (p90 after the slash on the
render column). “Readback” is the second draw of the source into our texture, “map” is
the staging-surface map plus the copy out, “infer” is measured on whichever thread runs
it, and “OBS lagged” reads lagged frames over frames composed in the window.
| Device | Mode | Readback | render p50 / p90 | readback | map+copy | preprocess | infer | upload | composite | OBS lagged |
|---|---|---|---|---|---|---|---|---|---|---|
| CPU | worker | 256² | 0.20 / 0.28 | 0.03 | 0.07 | 0.12 | 1.24 | 0.02 | 0.04 | 0 / 900 |
| CPU | worker | 1080p | 1.48 / 2.59 | 0.02 | 0.59 | 0.52 | 1.20 | 0.03 | 0.04 | 0 / 900 |
| CPU | sync | 256² | 1.79 / 2.59 | 0.02 | 0.06 | 0.11 | 1.42 | 0.04 | 0.07 | 0 / 900 |
| CPU | sync | 1080p | 2.82 / 5.04 | 0.03 | 0.77 | 0.45 | 1.44 | 0.03 | 0.05 | 0 / 901 |
| Iris Xe | worker | 256² | 0.18 / 0.39 | 0.03 | 0.07 | 0.14 | 5.30 | 0.02 | 0.03 | 0 / 900 |
| Iris Xe | worker | 1080p | 1.43 / 2.43 | 0.03 | 0.65 | 0.44 | 4.97 | 0.03 | 0.03 | 0 / 900 |
| Iris Xe | sync | 256² | 3.47 / 4.85 | 0.03 | 0.07 | 0.14 | 3.06 | 0.04 | 0.05 | 0 / 900 |
| Iris Xe | sync | 1080p | 3.77 / 5.38 | 0.03 | 0.63 | 0.40 | 2.40 | 0.04 | 0.05 | 0 / 901 |
| RTX 3060 | worker | 256² | 0.19 / 0.36 | 0.03 | 0.07 | 0.16 | 1.71 | 0.02 | 0.03 | 0 / 900 |
| RTX 3060 | worker | 1080p | 1.19 / 1.92 | 0.03 | 0.57 | 0.42 | 1.72 | 0.02 | 0.03 | 0 / 900 |
| RTX 3060 | sync | 256² | 2.07 / 2.50 | 0.02 | 0.06 | 0.12 | 1.73 | 0.02 | 0.04 | 0 / 900 |
| RTX 3060 | sync | 1080p | 2.74 / 3.59 | 0.02 | 0.54 | 0.40 | 1.68 | 0.02 | 0.03 | 0 / 900 |
Four things to read off it.
The plumbing is 0.2 ms when the GPU does the resize. Worker mode with a 256×256 readback costs the graphics thread 0.18 to 0.21 ms per frame on every device and both renditions: 0.03 ms to draw the source small, 0.07 to map and copy 256 KB, 0.02 to upload the mask, 0.04 to composite. Reading back at the source’s resolution instead puts 0.6 ms of map and 0.5 ms of CPU resize on the thread, and the callback lands at 1.2 to 1.5 ms at 1080p. Still tiny against 33 ms, but six to eight times the alternative for no benefit.
The CPU model is faster inside the plugin than in Python. The Python benchmark above said 4.5 ms for FP16 on the CPU; the C++ worker measures 1.2 ms for the same IR on the same core. The difference is the Python call overhead around a 1 ms kernel, and it is a reminder that a microbenchmark of a tiny model in Python is mostly measuring Python.
On the iGPU, the worker competes with the compositor. Look at the Iris Xe rows: the model takes 5.3 ms on the worker and 3.1 ms in sync mode. The iGPU is the same silicon OBS renders with, so a worker thread that submits OpenCL work while the graphics thread is submitting OpenGL work slows both down, and serialising them (sync) makes each one faster. The RTX, which OBS is not rendering on, shows no such gap (1.71 vs 1.73 ms). The right answer on an iGPU is still the worker, because the graphics thread’s 0.18 ms is what the rest of OBS sees; the model takes a little longer to arrive, off the critical path.
Nothing here drops a frame, and that is the honest result for a 1 ms model. Sync mode costs the graphics thread 1.8 to 3.8 ms, well inside the budget. The plugins that run inference on this thread get away with it because their models are this small. The next table is what happens when the model is not.
When the model is ten times heavier
The plugin has a repeats property that runs the network N times per frame and changes
nothing else. It exists for this table: the same pipeline carrying a model ten and
twenty times heavier, 1080p rendition, FP16, 256² readback. “Masks/s” is inferences
completed per second; “dropped” is frames the render thread offered the worker while it
was still busy, which in worker mode means the picture went out with the previous mask.
| Device | Mode | Model | on the graphics thread p50 | model p50 | masks/s | dropped | OBS lagged / total | OBS fps |
|---|---|---|---|---|---|---|---|---|
| CPU | worker | ×10 | 0.14 ms | 8.5 ms | 30.1 | 0 | 0 / 900 | 30.0 |
| CPU | sync | ×10 | 10.62 ms | 10.2 ms | 30.2 | 0 | 0 / 900 | 30.0 |
| Iris Xe | worker | ×10 | 0.14 ms | 23.9 ms | 30.1 | 3 | 0 / 900 | 30.0 |
| Iris Xe | sync | ×10 | 20.31 ms | 20.0 ms | 30.1 | 0 | 0 / 900 | 30.0 |
| RTX 3060 | worker | ×10 | 0.15 ms | 13.9 ms | 30.1 | 0 | 0 / 900 | 30.0 |
| RTX 3060 | sync | ×10 | 14.05 ms | 13.7 ms | 30.0 | 0 | 0 / 900 | 30.0 |
| CPU | worker | ×20 | 0.14 ms | 14.9 ms | 30.1 | 1 | 0 / 900 | 30.0 |
| CPU | sync | ×20 | 14.73 ms | 14.4 ms | 30.2 | 0 | 0 / 900 | 30.0 |
| Iris Xe | worker | ×20 | 0.12 ms | 36.9 ms | 27.0 | 95 | 0 / 900 | 30.0 |
| Iris Xe | sync | ×20 | 34.09 ms | 33.6 ms | 26.8 | 0 | 100 / 900 | 27.1 |
From output/plugin_stages.csv (×10) and output/plugin_stages_heavy.csv (×20).
The last two rows are the whole argument. With a 34 ms model on the iGPU, sync mode puts 34 ms on the graphics thread, OBS’s own frame time goes to 37 ms against a 33 ms budget, it drops 100 frames in 30 seconds, and every output, the virtual camera included, falls to 27 fps. The worker with the same model puts 0.12 ms on the thread; OBS stays at 30 fps with zero lagged frames, and what degrades is the mask, which now arrives 27 times a second instead of 30, so 95 of 905 frames went out wearing the previous mask. A viewer sees a mask edge that is one frame stale on one frame in ten. A viewer of the sync version sees the video stutter. An earlier run of the same sync row dropped 176 frames; the number moves run to run, the sign does not.
The ×10 rows show the other side: at 20 ms of sync inference on the iGPU nothing is dropped yet, because 20 is still under 33. The graphics thread does not care how good the model is, only whether its callback returns inside the frame.
Now you try
Drag the model time up to what a real transform costs, an avatar reenactment model at 40 to 80 ms say, and switch between the two threading modes. Watch which of the two numbers each mode sacrifices: delivered frames, or mask freshness.
From a camera to the virtual camera: the end-to-end number
The last measurement is the one a video-call viewer feels: how long a frame takes from
the camera to the application reading the virtual camera. It is measured entirely in
software. A Python script feeds a second v4l2loopback device as a fake camera playing
the 720p rendition of the clip; every frame carries the wall clock, in milliseconds,
written as a row of black-and-white blocks over the subject’s torso. OBS captures that
device at 720p30, runs the filter, and its Virtual Camera writes into the first loopback
device. A reader opens that device, decodes the blocks, and subtracts.
Two details earn their keep. The code rides on the torso because a background filter paints the background: a code in the corner comes out of the filter as flat colour, which is the mask doing its job. And the code is blocks rather than digits because it has to survive bilinear rescaling and the virtual camera’s YUYV conversion; OCR does not, a 4-bit checksum rejects torn frames, and the reader decodes at least 883 of the 900 frames in every 30 s window.
| Path | median | p90 |
|---|---|---|
| no filter | 48 ms | 49 ms |
| filter, worker | 48 ms | 49 ms |
| filter, sync | 50 ms | 52 ms |
| filter, sync, ×10 model | 67 ms | 73 ms |
| filter, worker, ×10 model | 47 ms | 48 ms |
Iris Xe, FP16, 256² readback, 30 s per path, from output/e2e_latency.csv.
The pipeline’s own floor is 48 ms: half a frame of sampling offset at the fake camera, OBS’s compositing pipeline, the virtual camera’s buffer, and the reader’s own 30 fps polling. Against that floor, the worker filter is invisible, at any model size. Sync mode adds the model’s time to every frame’s trip, 2 ms for the small model and 19 ms for the ×10 one, exactly as the threading section predicts: work on the graphics thread delays the frame itself.
One honest caveat about what this clock measures. The code travels in the person’s pixels, which the filter passes through, so the number is the latency of the video. In worker mode the mask composited onto a frame is up to one model-time old; that staleness is real, it is what the dropped-frames column in the heavy table counts, and this measurement does not see it. The video is never delayed by the worker; the mask edge trails fast motion by a frame.
Making it yours
The base is meant to outlive this payload. To put a different network in the shell:
- Export the model to OpenVINO IR. The pupil-diameter post
walks the PyTorch → ONNX → IR path, including what quantisation costs; drop the
.xml/.binpair underplugin/data/models/. - Rewrite
Segmenter::run: your preprocessing in, your postprocessing out, the same two-method surface. If the Python twin (src/obscv/core/segmenter.py) is updated to match, the whole benchmark suite in the repository runs against the new model unchanged. - Keep the effect file if the output is still a mask. If the network returns a full image, an avatar or a style transfer, upload it as a BGRA texture and draw it in place of the composite; the readback and the threading do not change.
- Size it before writing C++. Put the model’s milliseconds into the frame-budget lab
above, or run this plugin with the
repeatsmultiplier until it matches, and read off whether sync mode would drop frames on the target hardware. The heavy-model table is the chart for that: a 20 ms model survived sync mode at 1080p30 on the iGPU and a 34 ms model dropped one frame in nine, while the worker held 30 fps at every size and paid in mask freshness.
Limitations
- The model is a stand-in. A 106K-parameter segmenter says nothing about whether an avatar reenactment network can hit 30 fps; it says what the pipe costs around any model. LivePortrait, the obvious candidate for a real avatar transform, is 130M parameters and runs at about 12 fps on an RTX 3090 through ONNX Runtime by its own maintainers’ numbers, and has no iGPU path at all. On this hardware the honest answer for that kind of payload is the RTX, TensorRT, and a lot less than 1080p through the network.
- One laptop, one clip. The plumbing numbers are for an i7-12700H, an Iris Xe and an RTX 3060 Laptop on Ubuntu 22.04 under X11, with OBS 30.2.3. Windows uses Direct3D 11 rather than OpenGL and the staging path has different costs; the build is documented from the official template but not measured.
- Mask quality is the model’s, and it shows. The plant and the desk edge in the screenshot are misclassified in every precision. The temporal smoothing option trades a few frames of lag for a steadier edge; it does not fix a wrong edge.
- One run per cell. Each configuration ran once for 30 seconds. The p50s are stable to a tenth of a millisecond between the five-second windows, the p90s less so, and no claim below rests on a p90 difference under 0.5 ms.
- The end-to-end number is the software pipeline only. It starts when the fake camera writes a frame and ends when the reader decodes it, and includes nothing a real camera adds.
- Licence. The plugin source is Apache-2.0;
libobsis GPL-2.0-or-later, so a distributed binary carries GPL-compatible terms. The model is Apache-2.0, the dataset CC BY-SA 4.0, the clip under the Pexels licence; none of them is redistributed in the repository, the tooling fetches each at run time.
Reproducibility
| Parameter | Value |
|---|---|
| CPU | Intel Core i7-12700H (20 threads), 32 GB RAM |
| iGPU | Intel Iris Xe Graphics, OpenVINO GPU.0, intel-opencl-icd 24.17 |
| dGPU | NVIDIA GeForce RTX 3060 Laptop 6 GB, OpenVINO GPU.1 |
| OS | Ubuntu 22.04.5, kernel 6.8.0, X11 |
| OBS | 30.2.3 (obsproject PPA), obs-websocket 5.5.2 |
| Plugin build | GCC 13.4, CMake 4.4.2, libobs 30.2.3 headers, OpenVINO 2026.3.0 C++ archive, OpenCV 4.5.4 |
| Python tooling | Python 3.13.5, openvino 2026.3.1, nncf 3.3.0, onnxruntime-gpu 1.29.0, opencv-python-headless 5.0.0 |
| Model | onnx-community/mediapipe_selfie_segmentation (Apache-2.0), 106,417 params, and the _landscape variant |
| Data | EasyPortrait test split, 200 images sampled with seed 0 (CC BY-SA 4.0); Pexels clip 5941016, 1920×1080@25, 16.5 s |
| Model benchmark | uv run obscv benchmark: 20 warmup + 500 timed calls per cell, LATENCY hint, one infer request, preprocessing excluded, mean reported |
| In-OBS benchmark | uv run obscv obs-bench --seconds 30 (plus --heavy 20 for the ×20 rows): 5 s settle, 30 s measured per configuration, p50/p90 of per-frame stage times, one run per cell |
| Latency | uv run obscv latency-bench --device GPU.0 --seconds 30: fake camera → OBS V4L2 source → filter → Virtual Camera → reader, 30 s per path |
| Excluded | model compile (cached), the first five seconds of each configuration, real-camera exposure and USB |
Every number in the prose matches output/speed.csv, output/quality.csv,
output/plugin_stages.csv, output/plugin_stages_heavy.csv or output/e2e_latency.csv
in the repository.
Takeaways
- The virtual camera is an output OBS already has on all three platforms. The work is a
filter, and a filter that touches frames is C or C++ against
libobs. - The split that carries to the next plugin: a shell that knows OBS, plumbing that knows BGRA in and mask out, and a payload behind two methods. Swapping the model touches one class and one shader.
filter_video,video_renderandvideo_tickall run on the one graphics thread. Inference goes on a worker behind a one-slot mailbox, and the render only hands off and picks up.- Read back at the model’s size, not the source’s.
gs_orthomakes the GPU do the resize for free, and mapping last frame’s staging surface keeps the CPU from waiting on the GPU. - A 0.4 MB model costs 1.2 to 5.3 ms on a CPU, an iGPU and an RTX alike, and INT8 buys nothing at that size. The pipe is the thing to measure.
- End to end, this software pipeline runs at a 48 ms floor from fake camera to virtual camera; the worker-mode filter adds nothing a clock with millisecond resolution can see, and sync mode adds the model’s full time to every frame.
Further reading
- The API itself: the OBS Studio sources reference [1] and the plugin guide in the
knowledge base are short and current; read
async-delay-filter.cin the OBS tree for the smallest complete async filter. - Segmentation as a subject: Szeliski, Computer Vision: Algorithms and Applications, 2nd ed., §6.4 [18], for what these networks are doing and where the field went after them.
- Related on CondadosAI: IoU and Dice, and what they miss for the metric used above · RF-DETR vs YOLO-NAS on an Intel iGPU for the OpenVINO INT8 path on a model where it does pay · YOLO26 and RF-DETR segmentation on OpenVINO for heavier masks on the same hardware.
References
[1] OBS Project. OBS Studio Documentation: Source API Reference (obs_source_t), obs_source_info.filter_video, video_render, video_tick. docs.obsproject.com/reference-sources.
[2] OBS Project. OBS Studio Documentation: Graphics API, gs_stage_texture, gs_stagesurface_map, gs_texture_set_image. docs.obsproject.com/reference-libobs-graphics-graphics.
[3] OBS Project. obs-plugintemplate, GitHub repository and Quick Start Guide. github.com/obsproject/obs-plugintemplate.
[4] OBS Project. Virtual Camera Guide, OBS Knowledge Base. obsproject.com/kb/virtual-camera-guide.
[5] OBS Project. OBS Studio 26.1 release notes. github.com/obsproject/obs-studio/releases/tag/26.1.0.
[6] v4l2loopback contributors. OBS Studio, v4l2loopback wiki. github.com/v4l2loopback/v4l2loopback/wiki/OBS-Studio.
[7] OBS Project. OBS Studio Documentation: Scripting. docs.obsproject.com/scripting.
[8] Intel. OpenVINO Documentation (2026): GPU Device. “The GPU plugin is an OpenCL based plugin for inference of deep neural networks on Intel GPUs, both integrated and discrete ones.” docs.openvino.ai/2026/…/gpu-device.html. The non-Intel enumeration comes from src/plugins/intel_gpu/src/runtime/ocl/ocl_device_detector.cpp in the OpenVINO repository (PR #12577, “Baseline for enabling GPUs from other vendors”, 2022).
[9] OBS Project. libobs/obs.h, exports obs_get_average_frame_time_ns, obs_get_total_frames, obs_get_lagged_frames (not on the Sphinx core reference page). github.com/obsproject/obs-studio/blob/master/libobs/obs.h.
[10] Google. MediaPipe: Image segmentation guide, selfie segmentation model, and Hou, T., Pisarchyk, S., & Raveendran, K. (2021), Model Card: MediaPipe Selfie Segmentation, Apache-2.0. developers.google.com/edge/mediapipe/solutions/vision/image_segmenter · model card (PDF).
[11] onnx-community. mediapipe_selfie_segmentation, ONNX export, Apache-2.0. huggingface.co/onnx-community/mediapipe_selfie_segmentation.
[12] Kvanchiani, K., Petrova, E., Efremyan, K., Sautin, A., & Kapitanov, A. (2023). EasyPortrait: Face Parsing and Portrait Segmentation Dataset. arXiv:2304.13509 (author list as on arXiv v3; the dataset card lists Kapitanov, Kvanchiani and Kirillova). Clip: Theo Decker, Casual Businessman Looking at Camera and Talking, Pexels 5941016, Pexels licence.
[13] Intel. OpenVINO Documentation (2026): Post-training Quantization, Basic Quantization Flow. docs.openvino.ai/2026/…/basic-quantization-flow.html.
[14] Shilkrot, R., Udagawa, K., et al. obs-backgroundremoval, GPL-3.0; background_filter_video_tick calls processImageForBackground synchronously. github.com/royshil/obs-backgroundremoval.
[15] Intel. OpenVINO Plugins for OBS Studio, Apache-2.0, archived 17 Aug 2026; background-filter-ov.cpp registers OBS_SOURCE_VIDEO | OBS_SOURCE_ASYNC with .filter_video. github.com/intel/openvino-plugins-for-obs-studio.
[16] Intel. OpenVINO Documentation (2026): High-level Performance Hints. docs.openvino.ai/2026/…/high-level-performance-hints.html.
[17] Intel. OpenVINO Documentation (2026): Model Caching Overview. docs.openvino.ai/2026/…/model-caching-overview.html.
[18] Szeliski, R. (2022). Computer Vision: Algorithms and Applications (2nd ed.), §6.4 (Semantic segmentation). Springer. szeliski.org/Book.